Install Armory Enterpriese for Spinnaker in Lightweight Kubernetes using the Armory Operator
Armory Enterprise requires a license. For more information, contact Armory.
Overview of installing Armory for proofs of concept work
This guide walks you through using the Armory Operator to install Armory in a Lightweight Kubernetes (K3s) instance running on an AWS EC2 instance. The environment is for POCs and development only. It is not meant for production environments.
See the Install on Kubernetes guide for how to install Armory using the Armory Operator in a regular Kubernetes installation.
If you want to install open source SpinnakerTM, use the open source Spinnaker Operator instead of the Armory Operator.
Prerequisites for installing Armory
- Know how to create a VM in AWS EC2
- Be familiar with AWS IAM roles and S3 buckets
- Have knowledge of Kubernetes Operators, which use custom resources to manage applications and their components
- Understand the concept of managing Kubernetes resources using manifests
Create an AWS EC2 instance
-
Requirements:
- Ubuntu Server 18.04 LTS (HVM), SSD Volume Type; 64-bit (x86)
- Minimum 2 vCPUs
- Minimum 8 GB of memory
- Minimum of 50 GB of storage
- Public IP
Install K3s
SSH into your VM and run the following command to install the latest version of K3s:
curl -sfL https://get.k3s.io | sh -s - --write-kubeconfig-mode 644
Output is similar to:
[INFO]  Finding release for channel stable
[INFO]  Using v1.18.6+k3s1 as release
[INFO]  Downloading hash https://github.com/rancher/k3s/releases/download/v1.18.6+k3s1/sha256sum-amd64.txt
[INFO]  Downloading binary https://github.com/rancher/k3s/releases/download/v1.18.6+k3s1/k3s
[INFO]  Verifying binary download
[INFO]  Installing k3s to /usr/local/bin/k3s
[INFO]  Creating /usr/local/bin/kubectl symlink to k3s
[INFO]  Creating /usr/local/bin/crictl symlink to k3s
[INFO]  Creating /usr/local/bin/ctr symlink to k3s
[INFO]  Creating killall script /usr/local/bin/k3s-killall.sh
[INFO]  Creating uninstall script /usr/local/bin/k3s-uninstall.sh
[INFO]  env: Creating environment file /etc/systemd/system/k3s.service.env
[INFO]  systemd: Creating service file /etc/systemd/system/k3s.service
[INFO]  systemd: Enabling k3s unit
Created symlink /etc/systemd/system/multi-user.target.wants/k3s.service → /etc/systemd/system/k3s.service.
[INFO]  systemd: Starting k3
Create an S3 bucket
Spinnaker’s Front50 service needs access to an S3 bucket, so create an S3 bucket with a globally unique name. See the Creating a bucket page in the Amazon Simple Storage Service docs for how to create a bucket and naming constraints.
On the Configure options screen, select Versioning and Default encryption.
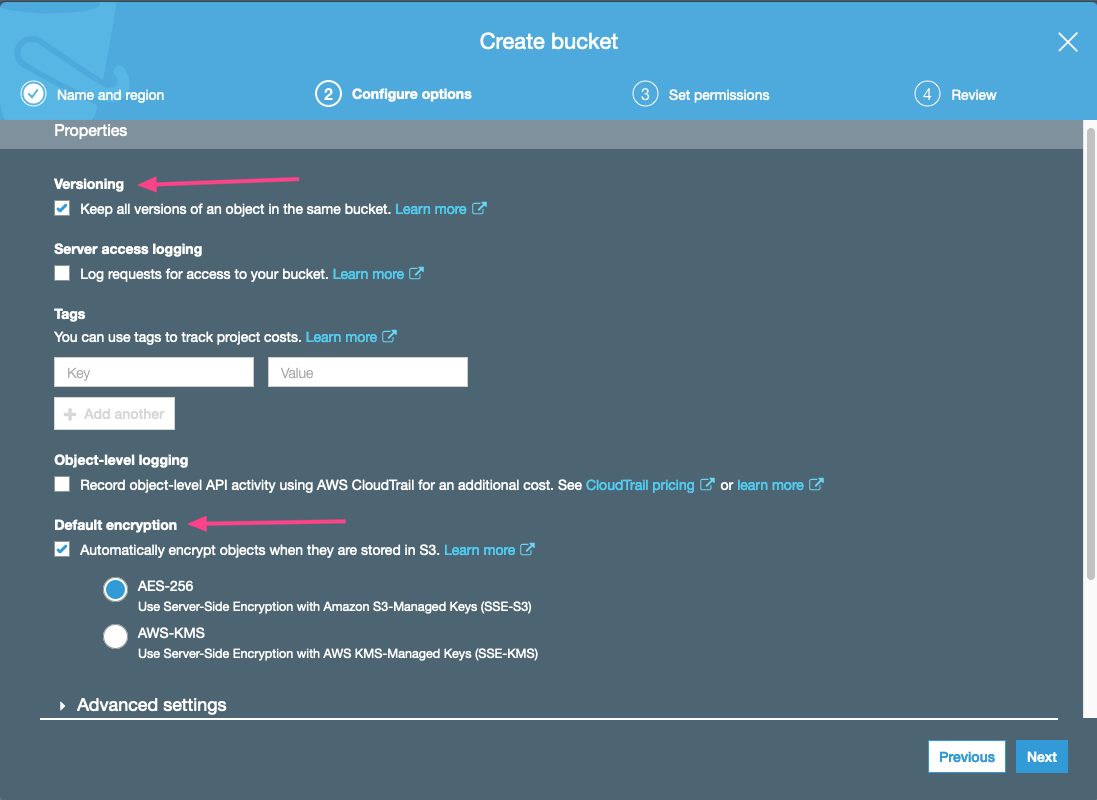
On the Set permissions screen, select Block all public access.
Create your bucket.
Create an IAM Role
Create an IAM Role that you will attach to your EC2 instance. Calls to S3 use this role to get credentials for the requests. You can read more about IAM Roles in AWS’ AWS Identity and Access Management guide.
-
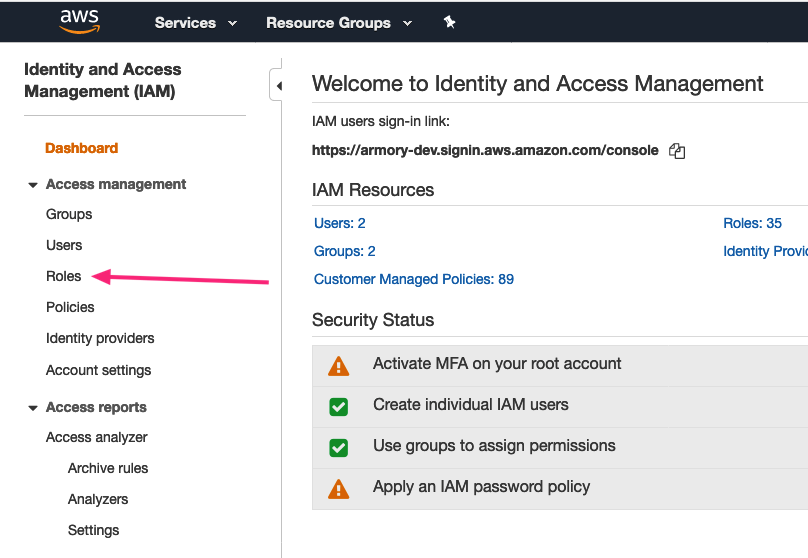
From the Services menu, select IAM in the Security, Identity, & Compliance section.

-
Select the Roles section.
-
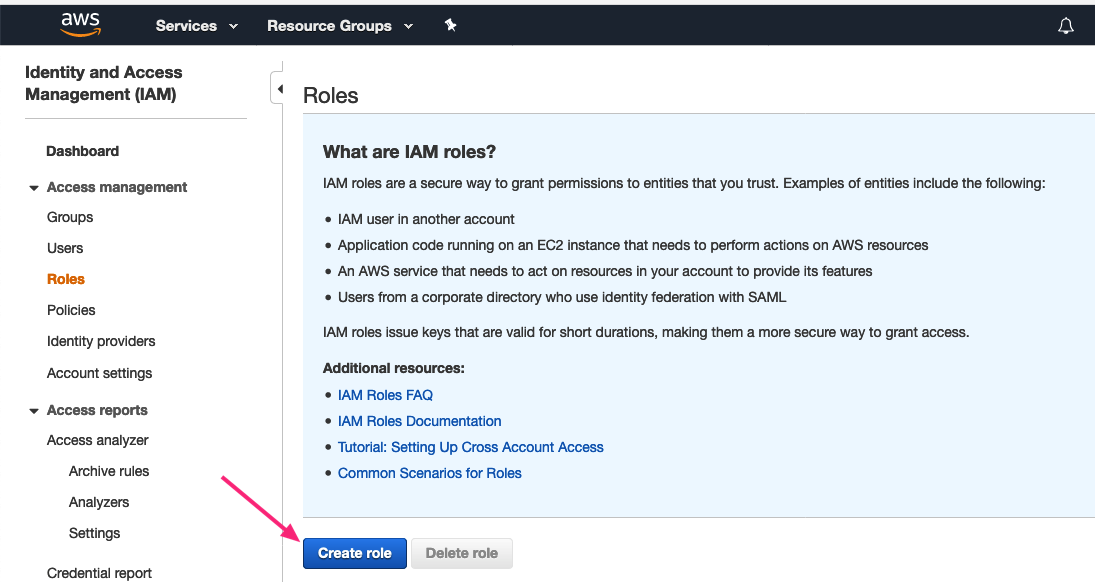
Press the Create role button.
-
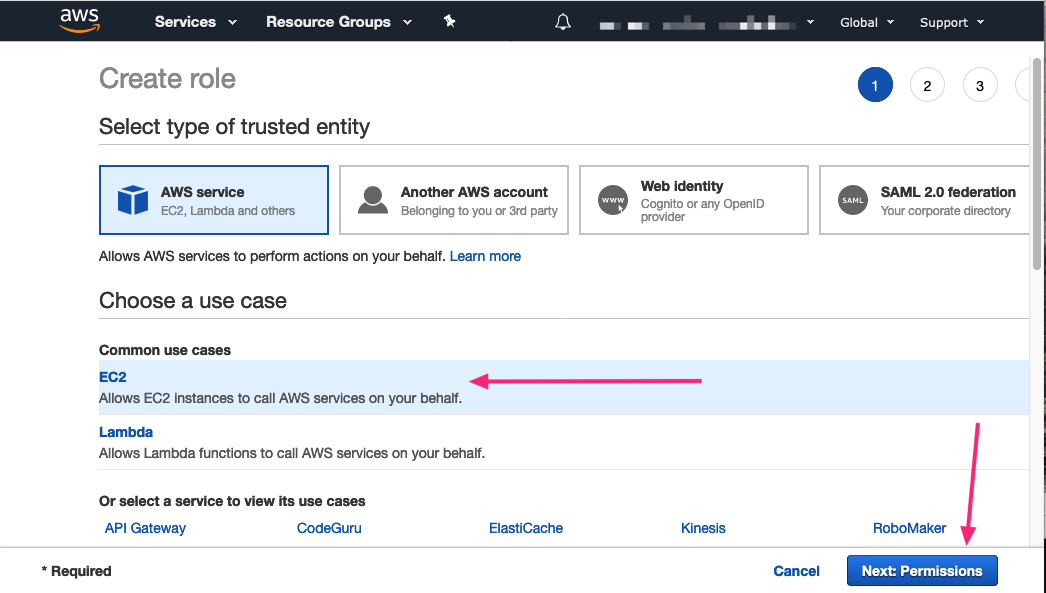
AWS Service is highlighted. Select EC2. Then press the Next: Permissions button.
-
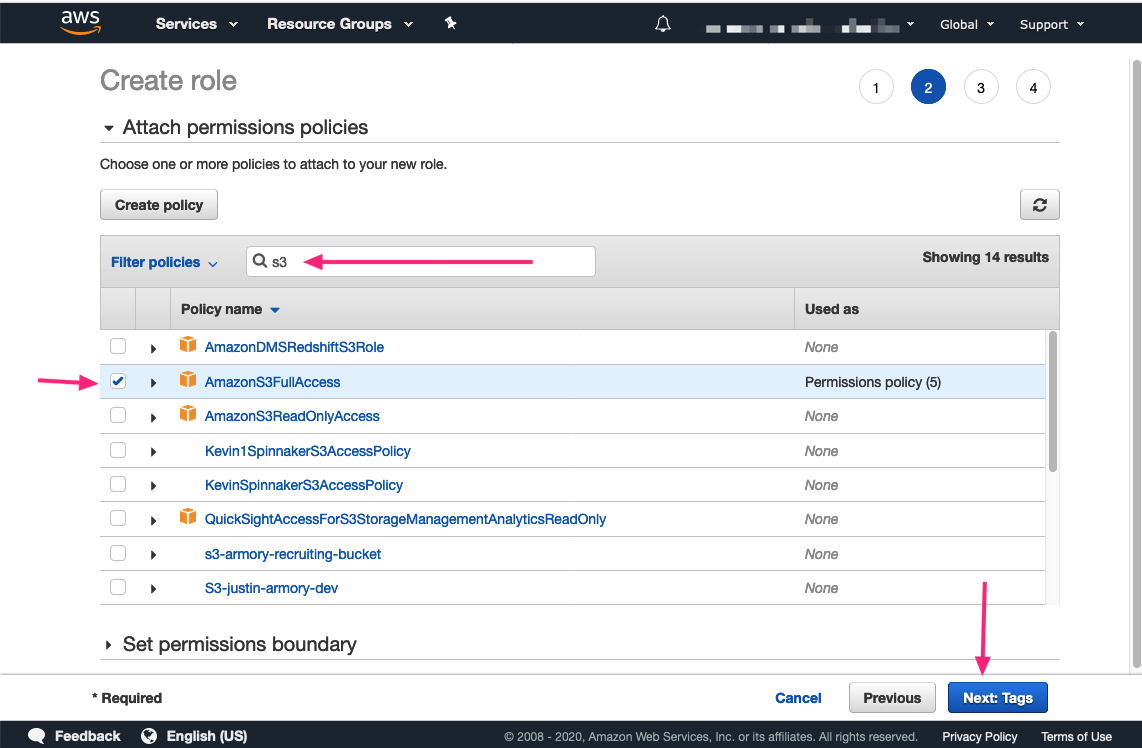
In the Filter policies field, type “s3” and press enter. This action displays polices for S3. Select AmazonS3FullAccess. Then press the Next: Tags button.
-
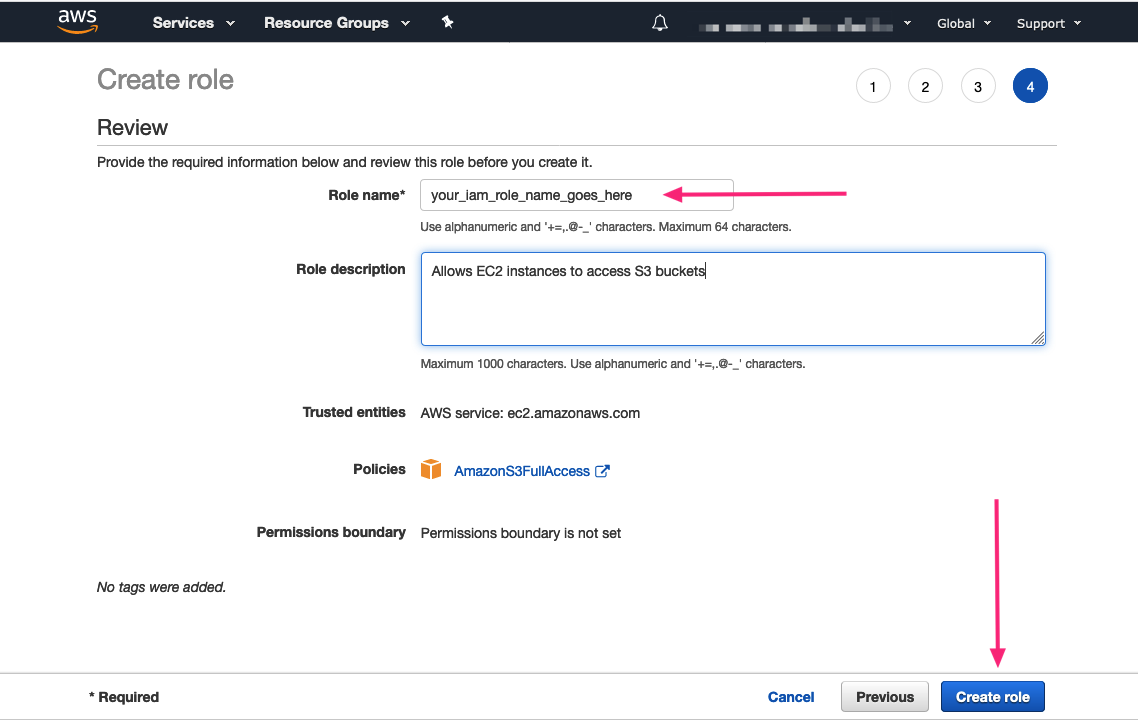
You can optionally add tags to your Role. Press the Next: Review button to move to the Review screen. Type in a name for your role in the Role name field and then press the Create role button.
Attach your IAM Role to your EC2 instance
-
Navigate to the EC2 services screen and then access your running instance. Select your instance. From the Actions menu, select Instance Settings and then Attach/Replace IAM Role.

-
Select the IAM role you created in the previous section. The press Apply.

Install the Armory Operator
Install the Armory Operator in basic mode, which installs Armory into a single namespace. This mode does not perform pre-flight checks before applying a manifest.
-
SSH into your EC2 VM and download the Armory Operator files:
mkdir -p spinnaker-operator && cd spinnaker-operator bash -c 'curl -L https://github.com/armory-io/spinnaker-operator/releases/latest/download/manifests.tgz | tar -xz' -
Install the Custom Resource Definitions (CRDs):
kubectl apply -f deploy/crds/ -
Create the
spinnaker-operatornamespace:kubectl create ns spinnaker-operator -
Install the Armory Operator on K3s:
kubectl -n spinnaker-operator apply -f deploy/operator/basicYou can verify successful installation by executing:
kubectl -n spinnaker-operator get podsTerminal output is similar to:
NAME                                  READY   STATUS    RESTARTS   AGE
spinnaker-operator-589ccc6fd4-56wlc   2/2     Running   0          4m28s
Modify the Armory manifest
Edit the SpinnakerService.yml manifest file located in the ~/spinnaker-operator/deploy/spinnaker/basic directory.
You can find detailed configuration information in the Armory Operator Configuration guide.
Update Armory version and S3 bucket name
Update the spec.spinnakerConfig.config.version value to the version of Armory you want to deploy. Check the Release Notes if you are unsure which version to install. Choose v2.20.4, v2.20.5 or v2.21+ if you want to deploy plugins.
Additionally, replace myBucket (spec.spinnakerConfig.config.persistentStorage.s3.bucket) with the name of the s3 bucket you created in Create an S3 Bucket.
Before editing:
kind: SpinnakerService
metadata:
  name: spinnaker
spec:
  # spec.spinnakerConfig - This section is how to specify configuration spinnaker
  spinnakerConfig:
    # spec.spinnakerConfig.config - This section contains the contents of a deployment found in a halconfig .deploymentConfigurations[0]
    config:
      version: 2.15.1   # the version of Spinnaker to be deployed
      persistentStorage:
        persistentStoreType: s3
        s3:
          bucket: mybucket
          rootFolder: front50
This example shows the config if your bucket is named my-s3-bucket and you want to install Armory 2.21.1::
kind: SpinnakerService
metadata:
  name: spinnaker
spec:
  # spec.spinnakerConfig - This section is how to specify configuration spinnaker
  spinnakerConfig:
    # spec.spinnakerConfig.config - This section contains the contents of a deployment found in a halconfig .deploymentConfigurations[0]
    config:
      version: 2.21.1   # the version of Spinnaker to be deployed
      persistentStorage:
        persistentStoreType: s3
        s3:
          bucket: my-s3-bucket
          rootFolder: front50
Modifications for running on K3s
Create a spec.spinnakerConfig.config.security section like the example below, replacing <your-vm-ip> with the public IP address of your EC2 instance. The security section is at the same level as the persistentStorage section.
kind: SpinnakerService
metadata:
  name: spinnaker
spec:
  # spec.spinnakerConfig - This section is how to specify configuration spinnaker
  spinnakerConfig:
    # spec.spinnakerConfig.config - This section contains the contents of a deployment found in a halconfig .deploymentConfigurations[0]
    config:
      version: 2.21.1   # the version of Spinnaker to be deployed
      persistentStorage:
        persistentStoreType: s3
        s3:
          bucket: my-s3-bucket
          rootFolder: front50
      security:
        apiSecurity: # Gate
          overrideBaseUrl: <your-vm-ip>:8084
        uiSecurity: # Deck
          overrideBaseUrl: <your-vm-ip>:9000
Find the expose.service.overrides section at the bottom of the file. Add configuration for Deck and Gate.
expose:
  type: service  # Kubernetes LoadBalancer type (service/ingress), note: only "service" is supported for now
  service:
    type: LoadBalancer
    annotations:
      service.beta.kubernetes.io/aws-load-balancer-backend-protocol: http
    # provide an override to the exposing KubernetesService
  overrides:
    deck:
      publicPort: 9000
    gate:
      publicPort: 8084
Spacing is very important in YAML files. Make sure that the spacing is correct in the SpinnakerService.yml file and that there are no tabs instead of spaces. Incorrect spacing or tabs cause errors when you install Spinnaker.
Show complete SpinnakerService.yml file
Install Armory
Because you installed the Armory Operator in basic mode, you must install Armory into the same spinnaker-operator namespace. Use kubectl apply to deploy the Armory manifest:
kubectl -n spinnaker-operator apply -f deploy/spinnaker/basic/SpinnakerService.yml
You can watch the installation progress by executing:
kubectl -n spinnaker-operator get spinsvc spinnaker -w
You can verify pod status by executing:
kubectl -n spinnaker-operator get pods
Upgrade Armory
Upgrade Armory by changing the version value in SpinnakerService.yml and using kubectl to apply the manifest.
Delete Armory
Since you installed Armory in the same namespace as the Armory Operator, do not delete the spinnaker-operator namespace unless you want to delete the Armory Operator as well.
You can use the kubectl delete command to delete Armory:
kubectl -n spinnaker-operator delete spinnakerservice spinnaker
Troubleshooting
You can access the Armory Operator logs by executing:
kubectl -n spinnaker-operator logs deploy/spinnaker-operator -c spinnaker-operator
Operator uses Halyard, so you can access the Halyard logs by executing:
kubectl -n spinnaker-operator logs deploy/spinnaker-operator -c halyard
Feedback
Was this page helpful?
Glad to hear it! Please tell us how we can improve.
Sorry to hear that. Please tell us how we can improve.